Continuing the theme of “doing things on Azure IoT without using our SDKs”, this article describes how to provision IOT devices with Azure IoT’s Device Provisioning Service over raw MQTT.
Previously, I wrote an article that describes how to leverage Azure IoT’s Device Provisioning Service over its REST API, as well as an article about connecting to IoT Hub/Edge over raw MQTT. Where possible, I do recommend using our SDKs, as they provide a nice abstraction layer over the supported transport protocols and frees you from all that protocol-level detailed work. However, we understand there are times and reasons where it’s just a better fit to do things over the raw protocols.
To support this, the Azure IoT DPS engineering team has documented the necessary technical details to register your device via MQTT. This document may provide enough details for you to figure out how to do it, but since I needed to test it for a customer anyway, I thought I’d capture a real-world example in hopes it can help others.
To make the scenario simpler, I chose to just use symmetric key attestation, but this would still work with any of the attestation methods supported by DPS.
Create individual enrollment
The first step is to create the enrollment in DPS. In the Azure portal, in your DPS instance, from the ‘overview’ tab, grab your Scope ID from the upper right of the ‘overview’ tab as shown below (I’ve blacked out part of my details, for obvious reasons)

Once you have that, copy it somewhere like notepad or equivalent, we’ll use it later. Once we have that, we can create our enrollment. On the left nav, click on “Manage Enrollments” and then “Add Individual Enrollment”. For “Mechanism”, choose Symmetric Key, enter a registration ID of your choosing (for the example further below, I used ‘my-mqtt-dev01’)
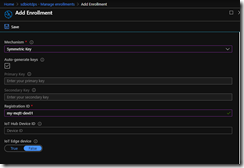
Click Save. Then drill back into your enrollment in the portal and copy the “Primary Key” and save it for later use.
Generate SAS token
Once you’ve created the enrollment and gotten the device key, we need to generate a SAS token for authentication to the DPS service. A description of the SAS token, and several code samples for generating one in various languages can be found here. Some of the inputs (discussed below) will be different for DPS versus IoT Hub, but the basic structure of the SAS token is the same.
For my purposes, I used this python code to generate mine:
————-
from base64 import b64encode, b64decode
from hashlib import sha256
from time import time
from urllib import quote_plus, urlencode
from hmac import HMAC
def generate_sas_token(uri, key, policy_name, expiry=3600000000):
ttl = time() + expiry
sign_key = “%s\n%d” % ((quote_plus(uri)), int(ttl))
print(sign_key)
signature = b64encode(HMAC(b64decode(key), sign_key, sha256).digest())
rawtoken = {
‘sr’ : uri,
‘sig’: signature,
‘se’ : str(int(ttl))
}
if policy_name is not None:
rawtoken[‘skn’] = policy_name
return ‘SharedAccessSignature ‘ + urlencode(rawtoken)
uri = ‘[dps URI]’
key = ‘[device key]’
expiry = [SAS token duration]
policy=’registration’
print(generate_sas_token(uri, key, policy, expiry))
——–
where:
- [dps URI] is of the form [DPS scope id]/registrations/[registration id]
- [device key] is the primary key you saved earlier
- [SAS token duration] is the number of seconds you want the token to be valid for
- policy is required to be ‘registration’ for DPS SAS tokens
running this code will give you a SAS token that looks something like this (changing a few random characters to protect my DPS):
SharedAccessSignature sr=0ne00055505%2Fregistrations%2Fmy-mqtt-dev01&skn=registration&sig=gMpllKo7qS1VR31vyfsT6JAcc4%2BHIu2gQSyai0Uz0KM%3D&se=1579698526
Now that we have our authentication credentials, we are ready to make our MQTT call.
Example call
The documentation does a decent job of showing the MQTT parameters and flow (read it first!), so I’m not going to repeat that here. What I will show is an example call with screenshots to ‘make it real’. For my testing, I used mqtt.fx, which is a pretty nice little interactive MQTT test client.
Once you download and install it, click on the little lightning bolt to switch from localhost to allow you to create a new connection to an MQTT server.
After that, click on the settings symbol next to the edit box to open the settings dialog that lets you edit the various connection profiles:

On the “Edit Connection Profiles” dialog, in the very bottom left hand corner, click the “+” symbol to create a new connection profile.
Give your connection a name and choose MQTT Broker as the Profile Type
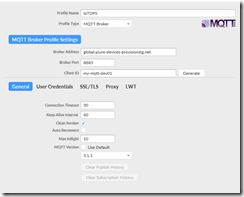
Enter the following settings in the top half of the dialog:
- for “Broker Address”, use ‘global.azure-devices-provisioning.net’
- for “Broker Port”, use “8883”
- for Client ID, enter your registration ID you used in the portal for your device
Click on the General ‘tab’ at the bottom. As in the screenshot above, for MQTT Version, uncheck the “Use Default” button and explicitly choose version 3.1.1. Leave other settings on this tab alone.
click on the “User Credentials” tab’
- for “User Name”, enter [DPS Scope Id]/registrations/[registration id]/api-version=2019-03-31 (replacing the scope id and registration id with your values)
- for “Password”, copy/paste in your SAS token you generated earlier

Move to the SSL/TLS tab. Check the box for “Enable SSL/TLS” and make sure that TLSv1.2 is chosen as the protocol

leave the proxy and LWT tabs alone.
Click Ok to save the settings and return to the main screen
Click on the Connect button and you should get a successful connection (you can verify by looking at the “log” tab)
Once connected, navigate to the “Subscribe” tab. We will set up a subscription on the dps ‘response’ MQTT topic to receive responses to our registration attempts from DPS. On the “Subscribe” tab, enter ‘$dps/registrations/res/#’ into the subscriptions box, choose “QoS1” from the buttons on the right, and click “Subscribe”. You should see an active subscription get set up and waiting on responses.

Click back over on the “Publish” tab and we will make our registration attempt. In the publish edit box, enter $dps/registrations/PUT/iotdps-register/?$rid={request_id}
replace {request_id} with an integer of your choosing (1 is fine to start with). This lets us correlate requests with responses when we get responses back from the service. For example, I entered:
$dps/registrations/PUT/iotdps-register/?$rid=1
in the big edit box beneath the publish edit box, we need to enter a ‘payload’ for the request. For DPS registration requests, the payload takes the form of a JSON document like this: {“registrationId”:”<registration id>”}
for example, for my sample it’s:
{“registrationId”: “my-mqtt-dev01”}

Hit the “Publish button”
Flip back over to the Subscribe tab and you should see on the right hand side of the screen that we’ve received a response from DPS. You should see something like this:

This indicates that DPS is in the process of ‘assigning’ and registering our device to an IoT Hub. This is a potentially long running operation, so to get the status of it, we have to query for that status. To do that, we are going to publish another MQTT message to check on the status. For that, we need the ‘operationId’ from the message we just received. In the screenshot above, mine looks like this:
4.22724a0213a69c4d.9750f5e6-b4c3-4760-9b15-4e74d6120bd1
Copy that ID as we’ll use it in the next step.
To check on the status of the operation, switch back over to the Publish tab and replace the values in the publish edit box with this
$dps/registrations/GET/iotdps-get-operationstatus/?$rid={request_id}&operationId={operationId}
replacing {request_id} with a new request id (2 in my case) and the {operationId} with the operationId you just copied. For example, with my sample values and the response received above, my request looks like this:
$dps/registrations/GET/iotdps-get-operationstatus/?$rid=2&operationId=4.22724a0213a69c4d.9750f5e6-b4c3-4760-9b15-4e74d6120bd1
Delete the JSON in the payload box and click “publish”
Switch back over to the Subscribe tab and you should notice that you’ve received a response to your operational status query, similar to this:
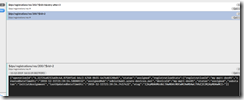
Notice the status of “assigned”, as well as details like “assignedHub” that gives the state of the successful registration and connection details.
If you navigate back over to the azure portal and look at the enrollment record for your device (refresh the page.. you may have to exit and re-enter), you should see something like this:
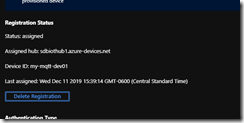
This indicates that our DPS registration was successful.
In the “real world”, in your application, you’ll make the registration attempt and then poll the operational status until it gets to the state of ‘assigned’. There will be intermediate states while it is being assigned, but doing this manually through a GUI, I’m not fast enough to catch them 
Enjoy – and let me know in the comments if you have any questions or issues.


