This will be a two-part article on how to provision IoT devices using Microsoft’s Azure IoT Device Provisioning Service, or DPS, via its REST API. DSP is part of our core IoT platform. It gives you an global-scale solution for near zero touch provisioning and configuration of your IoT Devices. We make the device-side provisioning pretty easy with nice integration with our open-source device SDKs.
With that said, one of our core design tenants for our IoT platform is that, while they do make life easier for you in most instances, you do not have to use our SDKs to access any of our services, whether that’s core IoT Hub itself, IoT Edge, or in this case, DPS.
I recently had a customer ask about invoking DPS for device registration from their field devices over the REST API. For various reasons I won’t dive deep in, they didn’t want to use our SDKs and preferred the REST route. The REST APIs for DPS are documented, but.. well.. we’ll just say “not very well” and leave it at that……..
ahem……..
anyway..
So I set out to figure out how to invoke device registration via the REST APIs for my customer and thought I would document the process here.
Ok, enough salad, on to the meat of the post.
First of all, this post assumes you are already familiar with DPS concepts have maybe even played with it a little. If not, review the docs here and come back. I’ll wait……….
Secondly, in case you didn’t notice the “part 1” in the title, because of the length, this will be a two-part post. The first half will show you how to invoke DPS registration over REST for the x.509 certificate attestation use cases, both individual and group enrollments, and part 2 will show for the Symmetric Key attestation use cases.
NOTE- but what about TPM chip-based attestation?, you might ask.. Well, I’m glad you asked! Using a TPM-chip for storing secrets and working with any IoT device is a best practice that we highly recommend! with that said, I’m not covering it for three reasons, 1) the process will be relatively similar to the other scenarios, 2) despite it being our best practice, I don’t personally have any customers today it (shame on us all!) and 3) I don’t have an IoT device right now that has a TPM to test with 
One final note – I’m only covering the registration part from the device side. There are also REST APIs for enrolling devices and many other ‘back end’ processes that I’m not covering. This is partially because the device side is the (slightly) harder side, but also because it’s the side that is more likely to need to be invoked over REST for constrained devices, etc.
Prep work (aka – how do I generate test certs?)
The first thing we need f0r x.509 certificate attestation is, you guess it, x.509 certificates. There are several tools available out there to do it, some easy, and some requiring an advanced degree in “x.509 Certificate Studies”. Since I don’t have a degree in x.509 Certificate Studies, I chose the easy route. But to be clear, I just picked this method, but any method that can generate valid x.509 CA and individual certs will work.
The tool I chose is provided by the nice people who write and maintain our Azure IoT SDK for Node.js. This tool is specifically written to work/test with DPS, so it was ideal. Like about 50 other tools, it’s a friendly wrapper around openssl. Instructions for installing the tool are provided in the readme and I won’t repeat them here. Note that you need NodeJs version 9.x or greater installed for it to work.
For my ‘dev’ environment, I used Ubuntu running on Windows Subsystem for Linux (WSL) (man, that’s weird for a 21-year MSFT veteran to say), but any environment that can run node and curl will work.
Also, final note about the cert gen scripts.. these are scripts for creating test certificates… please.. pretty please.. don’t use them for production. If you do, Santa will be very unhappy with you!
In the azure portal, I’ll assume you’ve already set up a DPS instance. At this point, on the DPS overview blade, note your scope id for your instance (upper right hand side of the DPS Overview blade), we’ll need it here in a sec. From here on out, I’ll refer to that as the [dps_scope_id]
The next two sections tell you how to create and setup the certs we’ll need for either the Individual or Group Enrollments. Once the certs are properly setup, the process for making the API calls are the same, so pick the one of the next two sections that apply to you and go (or read them both if you are really thirsty for knowledge!)
x.509 attestation with Individual Enrollments – setup
Let’s start with the easy case, which is x.509 attestation with an Individual Enrollment. The first thing I want to do is to generate some certs.
For my testing, using the create_test_cert tool to create a root certificate, and a device certificate for my individual enrollment, using the following two commands.
node create_test_cert.js root “dps-test-root”
node create_test_cert.js device “dps-test-device-01” “dps-test-root”
The tool creates the certificates with the right CN/subject, but when saving the files, it drops the underscores and camel-cases the name. I have no idea why. Just roll with it. Or feel free to create a root cert and device cert using some other tool. The key is to make the subject/CN of the device cert be the exact same thing you plan to make your registration id in DPS. They HAVE to match, or the whole thing doesn’t work. For the rest of the article, I will refer to the registration id as [registration_id]
so my cert files look like this…. (click on the pic to make it larger)

Back in the Azure portal, under “Manage enrollments” on the left nav, click on “Add Individual Enrollment”. On the “Add Enrollment” blade, leave the default of “X.509” for the Mechanism. On the “Primary Certificate .pem or .cer file”, click on the folder and upload/choose the device certificate you generated earlier (in my case, it’s dpsTestRoot_cert.pem).
The top half of my “Add Enrollment” blade looks like this (everything below it is default)
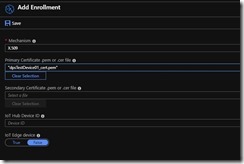
I chose to leave the IoT Hub Device ID field blank. If you want your device ID in Hub to be something different than your registration id (which is the CN/subject name in your cert), then you can enter a different name here. click SAVE to save your enrollment and we are ready to go.
x.509 attestation with Group Enrollments – setup
Ok, if you’re reading this section, you are either a curious soul, or decided to go with the group enrollment option for x.509 attestation with DPS.
With the umbrella of group enrollment, there are actually two different options for the ‘group’ certificate, depending on whether or not you want to leverage a root CA certificate or an intermediate certificate. For either option, for test purposes, we’ll go ahead and generate our test certificates. The difference will primarily be which one we give to DPS. In either case, once the certificate is in place, we can authenticate and register any device that presents a client certificate signed by the CA certificate that we gave to DPS. For details of the philosophy behind x.509 authentication/attestation for IoT devices, see this article.
For this test, I generated three certificates, a root CA cert, an intermediate CA cert (signed by the root), and an end IoT device certificate, signed by the intermediate CA certificate. I used the following commands to do so.
node create_test_cert.js root “dps-test-root”
this generated my root CA certificate
node create_test_cert.js intermediate “dps-test-intermediate” “dps-test-root”
this generated an intermediate CA certificate signed by the root CA cert I just generated
node ../create_test_cert.js device “dps-test-device-01” “dps-test-intermediate”
this generated a device certficate for a device called “dps-test-device-01” signed by the intermediate certificate above. So now I have a device certificate that ‘chains up’ through the intermediate to the root.
At this point, you have the option of either setting up DPS with the root CA certificate, or the Intermediate Certificate for attesting the identity of your end devices. The setup process for each option is slightly different and described below.
Root CA certificate attestation
For Root CA certificate attestation, you need to upload the root CA certificate that you generated, and then also provide proof of possession of the private key associated with that root CA certificate. That is to keep someone from impersonating the holder of the public side of the root CA cert by making sure they have the corresponding private key as well.
The first step in root CA registration is to navigate to your DPS instance in the portal and click “Certificates” in the left-hand nav menu. Then click “Add”. In the Add Certificate blade, give your certificate a name that means something to you and click on the folder to upload our cert. Once uploaded, click Save.
At that point, you should see your certificate listed in the Certificates blade with a status of “unverified”. This is because we have not yet verified that we have the private key for this cert.

The process for verifying that we have the private key for this cert involves having DPS generate a “verification code” (a cryptographic alphanumeric string” and then we will take that string and, using our root CA certificate, create a certificate with the verification code as the CN/Subject name and then sign that certificate with the private key of the root CA cert. This proves to DPS that we possess the private key. To do this, click on your newly uploaded cert. On the Certificate Details page, click on the “Generate Verification Code” button and it will generate a verification code as shown below.
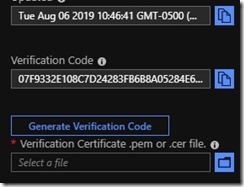
Copy that code. Back on the box that you are using to generate the certs, run this command to create the verification cert.
create_test_cert.js verification [–ca root cert pem file name] [–key root cert key pem file name] [–nonce nonce]
where –ca is the path to your root CA cert you uploaded, –key is the path to it’s private key, and–nonce is the verification code you copied from the portal, for example, in my case:
node ../create_test_cert.js verification –ca dpsTestRoot_cert.pem –key dpsTestRoot_key.pem –nonce 07F9332E108C7D24283FB6B8A05284E6B873D43686940ACE
This will generate a cert called “verification_cert.pem”. Back on the azure portal on the Certificates Detail page, click on the folder next to the box “Verification Certificate *.pem or *.cer file” and upload this verification cert and click the “Verify” button.
You will see that the status of your cert back on the Certificates blade now reads “Verified” with a green check box. (you may have to refresh the page with the Refresh button to see the status change).
Now click on “Manage enrollments” on the left-nav and click on “Add enrollment group”. Give it a meaningful name for you, make sure that “Certificate Type” is “CA Certificate” and choose the certificate you just verified from the drop-down box, like below.
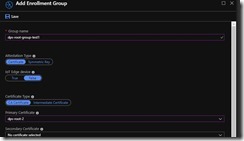
Click Save
Now you are ready to test your device cert. You can skip the next section and jump to the “DPS registration REST API calls” section
Intermediate CA certificate attestation
If you decided to go the Intermediate CA certificate route, which I think will be the most common, luckily the process is a little easier than with a root CA certificate. In your DPS instance in the portal, under “Manage enrollments”, click on Add Enrollment Group”. Make sure that Attestation Type is set to “Certificate” and give the group a meaningful name. Under “Certificate Type”, choose “Intermediate Certificate” and click on the folder next to “Primary Certificate .pem or .cer file” and upload the Intermediate Certificate we generated earlier. For me, it looks like this..
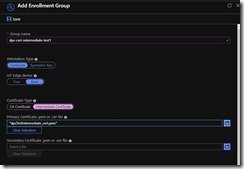
click Save and you are ready to go to the next section to try to register a device cert signed by your Intermediate Certificate.
The DPS registration REST API calls
Ok, so the moment you’ve all been waiting (very patiently) for…
As mentioned previously, now that the certs have all been created, uploaded, and setup properly in DPS, the process and the API calls from here on out is the same regardless of how you set up your enrollment in DPS.
For my testing, I didn’t want to get bogged down in how to make HTTP calls from various languages/platforms, so I chose the most universal and simple tool I could find, curl, which is available on both windows and linux.
The CURL command for invoking DPS device registration for x.509 individual enrollments with all the important and variable parameters in []’s..
curl -L -i -X PUT –cert ./[device cert].pem –key ./[device-cert-private-key].pem -H ‘Content-Type: application/json’ -H ‘Content-Encoding: utf-8’ -d ‘{“registrationId”: “[registration_id]“}’ https://global.azure-devices-provisioning.net/[dps_scope_id]/registrations/[registration_id]/register?api-version=2019-03-31
That looks a little complicated, so let’s break each part down
- -L : tells curl to follow HTTP redirects
- – i : tells curl to include protocol headers in output. Not strictly necessary, but I like to see them
- -X PUT : tells curl that is an HTTP PUT command. Required for this API call since we are sending a message in the body
- –cert : this is the device certificate that we, as a TLS client, want to use for client authentication. This parameter, and the next one (key) are the main thing that makes this an x.509-based attestation. This has to be the same cert you registered in DPS
- –key : the private key associated with the device certificate provided above. This is necessary for the TLS handshake and to prove we own the cert
- -H ‘Content-Type: application/json’ : required to tell DPS we are posting up JSON content and must be ‘application/json’
- -H ‘Content-Encoding: utf-8’ : required to tell DPS the encoding we are using for our message body. Set to the proper value for your OS/client (I’ve never used anything other than utf-8 here)
- -d ‘{“registrationId”: “[registration_id]”}’ : the –d parameter is the ‘data’ or body of the message we are posting. It must be JSON, in the form of “{registrationId”:”[registration_id”}. Note that for CURL, I wrapped it in single quotes. This nicely makes it where I don’t have to escape the double quotes in the JSON
- Finally, the last parameter is the URL you post to. For ‘regular’ (i.e not on-premises) DPS, the global DPS endpoint is global.azure-devices-provisioning.net, so that’s where we post. https://global.azure-devices-provisioning.net/[dps_scope_id]/registrations/[registration_id]/register?api-version=2019-03-31. Note that we have to replace the [dps_scope_id] with the one you captured earlier and [registration_id] with the one you registered.
you should get a return that looks something like this…

Note two things.. One is the operationId. DPS enrollment in an IoT Hub is a (potentially) long running operation, and thus is done asynchronously. So to see the status of your IoT Hub provisioning, we’ll need to poll for status. I’ll get to that in a minute. The second thing is the “status” field, which begins in the ‘assigning’ status.
The next API call we need to make is get the status. You’ll basically do this in a loop until you either get a success or failure status. The valid status values for DPS are:
-
- assigned
– the return value from the status call will indicate what IoT Hub the device was assigned to
- assigning
- disabled
– the device enrollment record is disabled in DPS, so we can’t assigned
- failed
– assignment failed. There will be an errorCode and errorMessage returned in an registrationState record in the returned JSON to indicate what failed.
- unassigned – ummm.. no clue.
To make the afore-mentioned status call, you need to copy the operationId from the return status above. The CURL command for that call is:
curl -L -i -X GET –cert ./dpsTestDevice01_cert.pem –key ./dpsTestDevice01_key.pem -H ‘Content-Type: application/json’ -H ‘Content-Encoding: utf-8’ https://global.azure-devices-provisioning.net/[dps_scope_id]/registrations/[registration_id]/operations/[operation_id]?api-version=2019-03-31
where [dps_scope_id] and [registration_id] are the same as above, and [operation_id] is the one you copied above. The return will look something like this, keeping in mind the registrationState record will change fields based on what the returned status was.

Unfortunately, I’m not a fast enough copy/paste-r to catch it in a status other than ‘assigned’ (DPS is just too fast for me). But you can try this all programmatically or in a script to do it.
Ta-Da!
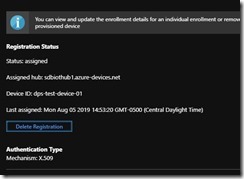
That’s it. You can navigate back to DPS, drill in on your device, and see the results
Enjoy – and as always, hit me up with any questions in the comments section.


