Azure IoT Device Provisioning Service (DPS) over MQTT

Continuing the theme of “doing things on Azure IoT without using our SDKs”, this article describes how to provision IOT devices with Azure IoT’s Device Provisioning Service over raw MQTT.

Previously, I wrote an article that describes how to leverage Azure IoT’s Device Provisioning Service over its REST API, as well as an article about connecting to IoT Hub/Edge over raw MQTT.  Where possible, I do recommend using our SDKs, as they provide a nice abstraction layer over the supported transport protocols and frees you from all that protocol-level detailed work.  However, we understand there are times and reasons where it’s just a better fit to do things over the raw protocols.

To support this, the Azure IoT DPS engineering team has documented the necessary technical details to register your device via MQTT.   This document may provide enough details for you to figure out how to do it, but since I needed to test it for a customer anyway, I thought I’d capture a real-world example in hopes it can help others.

To make the scenario simpler, I chose to just use symmetric key attestation, but this would still work with any of the attestation methods supported by DPS.

Create individual enrollment

The first step is to create the enrollment in DPS.  In the Azure portal, in your DPS instance, from the ‘overview’ tab, grab your Scope ID from the upper right of the ‘overview’ tab as shown below (I’ve blacked out part of my details, for obvious reasons)

dps-scope-id

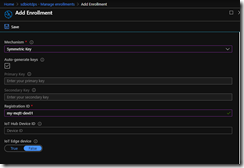
Once you have that, copy it somewhere like notepad or equivalent, we’ll use it later.  Once we have that, we can create our enrollment.  On the left nav, click on “Manage Enrollments” and then “Add Individual Enrollment”.  For “Mechanism”, choose Symmetric Key, enter a registration ID of your choosing (for the example further below, I used ‘my-mqtt-dev01’)

create-individual-enrollment

Click Save.  Then drill back into your enrollment in the portal and copy the “Primary Key”  and save it for later use.

Generate SAS token

Once you’ve created the enrollment and gotten the device key, we need to generate a SAS token for authentication to the DPS service.  A description of the SAS token, and several code samples for generating one in various languages can be found here.  Some of the inputs (discussed below) will be different for DPS versus IoT Hub, but the basic structure of the SAS token is the same.

For my purposes, I used this python code to generate mine:

————-

from base64 import b64encode, b64decode
from hashlib import sha256
from time import time
from urllib import quote_plus, urlencode
from hmac import HMAC

def generate_sas_token(uri, key, policy_name, expiry=3600000000):
ttl = time() + expiry
sign_key = “%s\n%d” % ((quote_plus(uri)), int(ttl))
print(sign_key)
signature = b64encode(HMAC(b64decode(key), sign_key, sha256).digest())

rawtoken = {
‘sr’ :  uri,
‘sig’: signature,
‘se’ : str(int(ttl))
}

if policy_name is not None:
rawtoken[‘skn’] = policy_name

return ‘SharedAccessSignature ‘ + urlencode(rawtoken)

uri = ‘[dps URI]’
key = ‘[device key]’
expiry = [SAS token duration]
policy=’registration’

print(generate_sas_token(uri, key, policy, expiry))

——–

where:

  • [dps URI] is of the form [DPS scope id]/registrations/[registration id]
  • [device key] is the primary key you saved earlier
  • [SAS token duration] is the number of seconds you want the token to be valid for
  • policy is required to be ‘registration’ for DPS SAS tokens

running this code will give you a SAS token that looks something like this (changing a few random characters to protect my DPS):

SharedAccessSignature sr=0ne00055505%2Fregistrations%2Fmy-mqtt-dev01&skn=registration&sig=gMpllKo7qS1VR31vyfsT6JAcc4%2BHIu2gQSyai0Uz0KM%3D&se=1579698526

Now that we have our authentication credentials, we are ready to make our MQTT call.

Example call

The documentation does a decent job of showing the MQTT parameters and flow (read it first!), so I’m not going to repeat that here.  What I will show is an example call with screenshots to ‘make it real’.   For my testing, I used mqtt.fx, which is a pretty nice little interactive MQTT test client.

Once you download and install it,  click on the little lightning bolt to switch from localhost to allow you to create a new connection to an MQTT server.

mqtt-lightning

After that, click on the settings symbol next to the edit box to open the settings dialog that lets you edit the various connection profiles:

mqttfx-settings-icon

On the “Edit Connection Profiles” dialog, in the very bottom left hand corner, click the “+” symbol to create a new connection profile.

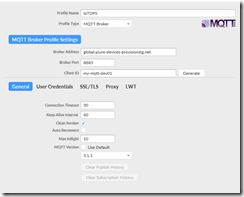
Give your connection a name and choose MQTT Broker as the Profile Type

mqtt-profile-settings-general

Enter the following settings in the top half of the dialog:

  • for “Broker Address”, use ‘global.azure-devices-provisioning.net’
  • for “Broker Port”, use “8883”
  • for Client ID, enter your registration ID you used in the portal for your device

Click on the General ‘tab’ at the bottom.  As in the screenshot above, for MQTT Version, uncheck the “Use Default” button and explicitly choose version 3.1.1.  Leave other settings on this tab alone.

click on the “User Credentials” tab’

  • for “User Name”, enter [DPS Scope Id]/registrations/[registration id]/api-version=2019-03-31  (replacing the scope id and registration id with your values)
  • for “Password”, copy/paste in your SAS token you generated earlier

mqtt-profile-user-creds

Move to the SSL/TLS tab.   Check the box for “Enable SSL/TLS” and make sure that TLSv1.2 is chosen as the protocol

mqtt-profile-tls

leave the proxy and LWT tabs alone.

Click Ok to save the settings and return to the main screen

Click on the Connect button and you should get a successful connection (you can verify by looking at the “log” tab)

Once connected, navigate to the “Subscribe” tab.  We will set up a subscription on the dps ‘response’ MQTT topic to receive responses to our registration attempts from DPS.  On the “Subscribe” tab, enter ‘$dps/registrations/res/#’ into the subscriptions box, choose “QoS1” from the buttons on the right, and click “Subscribe”.  You should see an active subscription get set up and waiting on responses.

mqtt-subscription-setup

Click back over on the “Publish” tab and we will make our registration attempt.  In the publish edit box, enter $dps/registrations/PUT/iotdps-register/?$rid={request_id}

replace {request_id} with an integer of your choosing (1 is fine to start with).  This lets us correlate requests with responses when we get responses back from the service.  For example, I entered:

$dps/registrations/PUT/iotdps-register/?$rid=1

in the big edit box beneath the publish edit box, we need to enter a ‘payload’ for the request.  For DPS registration requests, the payload takes the form of a JSON document like this:  {“registrationId”:”<registration id>”}

for example, for my sample it’s:

{“registrationId”: “my-mqtt-dev01”}

mqtt-reg-publish

Hit the “Publish button”

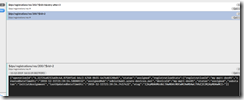
Flip back over to the Subscribe tab and you should see on the right hand side of the screen that we’ve received a response from DPS.  You should see something like this:

mqtt-registration-assigning

This indicates that DPS is in the process of ‘assigning’ and registering our device to an IoT Hub.  This is a potentially long running operation, so to get the status of it, we have to query for that status.  To do that, we are going to publish another MQTT message to check on the status.  For that, we need the ‘operationId’ from the message we just received.  In the screenshot above, mine looks like this:

4.22724a0213a69c4d.9750f5e6-b4c3-4760-9b15-4e74d6120bd1

Copy that ID as we’ll use it in the next step.

To check on the status of the operation, switch back over to the Publish tab and replace the values in the publish edit box with this

$dps/registrations/GET/iotdps-get-operationstatus/?$rid={request_id}&operationId={operationId}

replacing {request_id} with a new request id (2 in my case) and the {operationId} with the operationId you just copied. For example, with my sample values and the response received above, my request looks like this:

$dps/registrations/GET/iotdps-get-operationstatus/?$rid=2&operationId=4.22724a0213a69c4d.9750f5e6-b4c3-4760-9b15-4e74d6120bd1

Delete the JSON in the payload box and click “publish”

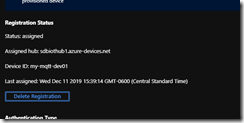
Switch back over to the Subscribe tab and you should notice that you’ve received a response to your operational status query, similar to this:

mqtt-registration-status

Notice the status of “assigned”, as well as details like “assignedHub” that gives the state of the successful registration and connection details.

If you navigate back over to the azure portal and look at the enrollment record for your device (refresh the page.. you may have to exit and re-enter), you should see something like this:

mqtt-registration-success

This indicates that our DPS registration was successful.

In the “real world”, in your application, you’ll make the registration attempt and then poll the operational status until it gets to the state of ‘assigned’.  There will be intermediate states while it is being assigned, but doing this manually through a GUI, I’m not fast enough to catch them Smile

Enjoy – and let me know in the comments if you have any questions or issues.

raw AMQP to IoT Hub and IoT Edge

It seems like lately my life has consisted mostly of trying to figure out how to connect “brownfield or legacy systems” (that’s MSFT-speak for “doesn’t use our IoT device SDKs” :-)) to Azure IoT Hub or Azure IoT Edge or both. I’ve previously in other posts shown how to do it with raw MQTT, Mosquitto, and Node-Red.

I was recently asked by a customer for a sample of connecting a raw AMQP client to IoT Edge. So with unbridled optimism, I quickly did a web search to hunt down what surely already existed as a sample. Both google and bing quickly dashed my hope for that (as they so often do). Even StackOverflow, the best hope for all development-kind failed me! So I waded in to figure it out myself.

Setting the stage

Just for simplicity, I used the python uamqp library for this. This is the AMQP library (or at least the C version of it) that we use ourselves underlying IoT Hub and IoT Edge (and service bus, event hub, etc), so it seemed like a natural fit. And it also came with a sample that I could start from and adapt. The code further below and information in this post is based on that sample. The primary two issues with the sample out of the box was that it used a ‘hub-level’ key vs. a device-scoped key for authentication to IoT Hub (don’t do that!) and for some reason it was written to show device-bound (cloud to device) connectivity vs. cloud-bound (device to cloud, aka ‘telemetry’) messaging. So I adapted the sample for my needs, and will show the adaptations below.

While it took me a little time to figure things out, the two most complicated parts where

  • Figuring out the right AMQP connection string format to connect to IoT Hub/Edge. This is normally handled under the covers with our SDKs, but getting it right without the SDKs took a little research and trial/error
  • Figuring out how to get the client to trust the certificate chain that edgeHub presents to connecting clients for TLS connections (for more details on how Edge uses certs, see this article by my very favorite author!). This second bullet is only needed if you are connecting to IoT Edge. The right root-ca certs (i.e. Baltimore) are embedded in the uamqp library for IoT Hub itself.

The format for the AMQP connection string is actually already documented here by our engineering team (under the “protocol specifics” section), but it’s not called out very obviously like the entire sub-article we have for MQTT, so I actually missed it for a while. If you use a device-scoped key (which you generally should), the correct format for the AMQP connection string is:


amqps://[device_id]@sas.[short-hub-name]:[sas-token]@[target-endpoint]/[operation]

where:

  • [device_id] is an iot-hub registered device id for an IoT device
  • [short-hub-name] is the name of your IoT Hub *without* the .azure-devices-net
    • NOTE: the combination of device_id and short-hub-name, which collectively is the ‘username’ in the connection string, must be URL encoded before sent
  • [sas-token] is a SAS token generated for your device
  • [target-endpoint] is either the name of your IoT Hub *with* the .azure-devices.net in the case of an IoT Hub direction connection OR it’s the FQDN of your IoT Edge box in the case of connecting to IoT Edge (i.e. mygateway.contoso.local)
  • [operation] is the desired operation. For example, to send telemetry data, operation is /devices/[device id]/messages/events

Just to show an example of what the connection string looks like with a live device and hub, below is an example of one of mine (with a few random characters in the sas-token changed to protect my hub :-))


amqps://amqptest%40sas.sdbiothub1:SharedAccessSignature+sr%3Dsdbiothub1.azure-devices.net%252Fdevices%252Famqptest%26sig%3DyfStnV4tfi3p7xeUg2DCTSauZowQ90Gplq3hKFzTY10%253D%26se%3D1552015962@mygateway.contoso.local/devices/amqptest/messages/events

where:

  • amqptest is the device id of my device registered in IoT Hub
  • sdbiothub1 is the name of my IoT Hub
  • mygateway.contoso.local is the FQDN of my IoT Edge device (not really, but you don’t need to know the real one…)
  • /devices/amqptest/messages/events is the ‘operation’ I’m invoking, which in the case of IoT Hub/Edge means to send device-to-cloud telemetry data

The code

ok, enough pre-amble, let’s get to the code

NOTE:  Please note - strangely enough, as of this writing (3/7/2019) the code and post below will NOT actually work today.  During my work and investigation, and working with one of the IoT Edge engineers, we discovered a small bug in edgeHub that prevented the raw AMQP connection string from being parsed correctly. The bug has already been fixed, per this pull request, but the fix won't be publicly available until later this month in the next official release.  But, since I'm internal MSFT and "it's good to be the king", I was able to get a private build of edgeHub to test against.  I'll update this post once the fix is publicly available.  (technically, if you really want it, you can do your own private build of edgeHub, since it's open source

The first step in using the sample is to install the uamqp library, the instructions for which can be found here.

Below is my modified version of the sample that i started with. I tried to annotate any change I made with a preceding comment that starts with #steve, so you can just search for them to understand what I changed, or just use the sample directly


#-------------------------------------------------------------------------
# Copyright (c) Microsoft Corporation. All rights reserved.
# Licensed under the MIT License. See License.txt in the project root for
# license information.
#--------------------------------------------------------------------------

import os
import logging
import sys
from base64 import b64encode, b64decode
from hashlib import sha256
from hmac import HMAC
from time import time
from uuid import uuid4
try:
    from urllib import quote, quote_plus, urlencode #Py2
except Exception:
    from urllib.parse import quote, quote_plus, urlencode

import uamqp
from uamqp import utils, errors

#steve - added to share the SAS token and username broadly
sas_token = ''
auth_username = ''

def get_logger(level):
    uamqp_logger = logging.getLogger("uamqp")
    if not uamqp_logger.handlers:
        handler = logging.StreamHandler(stream=sys.stdout)
        handler.setFormatter(logging.Formatter('%(asctime)s %(name)-12s %(levelname)-8s %(message)s'))
        uamqp_logger.addHandler(handler)
    uamqp_logger.setLevel(level)
    return uamqp_logger

log = get_logger(logging.DEBUG)

def _generate_sas_token(uri, policy, key, expiry=None):

    if not expiry:
        expiry = time() + 3600  # Default to 1 hour.
    encoded_uri = quote_plus(uri)
    ttl = int(expiry)
    sign_key = '%s\n%d' % (encoded_uri, ttl)
    signature = b64encode(HMAC(b64decode(key), sign_key.encode('utf-8'), sha256).digest())
    result = {
        'sr': uri,
        'sig': signature,
        'se': str(ttl)}
    #if policy:
    #    result['skn'] = policy
    return 'SharedAccessSignature ' + urlencode(result)


def _build_iothub_amqp_endpoint_from_target(target, deviceendpoint):
#steve - reference global sas_token and auth_username because we will use it outside this function
    global sas_token
    global auth_username

    hub_name = target['hostname'].split('.')[0]

#steve - the format for a *device scoped* key for amqp is
# [deviceid]@sas.[shortiothubhubname]
# this is the same for both IoT Hub and IoT Edge.  This is a change from the original sample
# which used a 'hub scoped' key
    endpoint = "{}@sas.{}".format(target['device'], hub_name)
#steve - grab the username for use later..  before the URL-encoding below
    auth_username = endpoint

    endpoint = quote_plus(endpoint)
    sas_token = _generate_sas_token(target['hostname'] + deviceendpoint, target['key_name'],
                                    target['access_key'], time() + 36000)

#  steve - the first line below is used for talking to IoThub, the second for IoT Edge
#  basically we are just changing the connection endpoint
#    endpoint = endpoint + ":{}@{}".format(quote_plus(sas_token), target['hostname'])
    endpoint = endpoint + ":{}@{}".format(quote_plus(sas_token), target['edgehostname'])
    return endpoint

def test_iot_hub_send(live_iothub_config):
#steve - reference my globals set earlier
    global sas_token
    global auth_username

    msg_content = b"hello world"
    app_properties = {"test_prop_1": "value", "test_prop_2": "X"}
    msg_props = uamqp.message.MessageProperties()
#steve - honestly dunno what this property does :-), but we aren't going devicebound, so nuked it
#    msg_props.to = '/devices/{}/messages/devicebound'.format(live_iothub_config['device'])
    msg_props.message_id = str(uuid4())
    message = uamqp.Message(msg_content, properties=msg_props, application_properties=app_properties)

#steve - the original sample was set up for cloud-to-device communication.  I changed the 'operation'
# to be device-to-cloud by changing the operation to /devices/[device id]/messages/events
    #operation = '/messages/devicebound'
    deviceendpoint='/devices/{}'.format(live_iothub_config['device'])
    operation = deviceendpoint + '/messages/events'
    endpoint = _build_iothub_amqp_endpoint_from_target(live_iothub_config, deviceendpoint)

    target = 'amqps://' + endpoint + operation
    log.info("Target: {}".format(target))

#steve - this is where the magic happens for Edge.  We need a way to specify the
# path to the root ca cert used for the TLS connection to IoT Edge.  So we need to
# manually created the SASLPlain authentication object to be able to specify that
# and then pass it to the SendClient method below.  All of that is not necessary
# just to talk directly to IoT Hub as the root Baltimore cert for IoT Hub itself is buried
# somewhere in the uamqp library
# if you are connecting to IoT Hub directly, you can remove/comment this line
    auth_settings = uamqp.authentication.SASLPlain(live_iothub_config['edgehostname'], auth_username, sas_token, verify=live_iothub_config['edgerootcacert'])

#steve - for iot hub  (simple because we don't have to worry about the edge TLS cert
#    send_client = uamqp.SendClient(target, debug=True)
# for iot edge
    send_client = uamqp.SendClient(target, debug=True, auth=auth_settings)
    send_client.queue_message(message)
    results = send_client.send_all_messages()
    assert not [m for m in results if m == uamqp.constants.MessageState.SendFailed]
    log.info("Message sent.")

if __name__ == '__main__':
    config = {}
#steve - changed from environment variables to hardcoded, just for this sample
#    config['hostname'] = os.environ['IOTHUB_HOSTNAME']
#    config['device'] = os.environ['IOTHUB_DEVICE']
#    config['key_name'] = os.environ['IOTHUB_SAS_POLICY']
#    config['access_key'] = os.environ['IOTHUB_SAS_KEY']
    config['hostname'] = 'your long iothub name'  # e.g. 'sdbiothub1.azure-devices.net'
    config['device'] = 'your device id'  # e.g. 'amqptest'
    config['key_name'] = ''  # leave empty string
    config['access_key'] = 'your primary or secondary device key'   # e.g 'P38y2x3vdWNGu7Fd9Tqq9saPgDry/kZTyaKmpy1XYhg='
#steve - the FQDN of your edge box (i.e. mygateway.local)
# it MUST match the 'hostname' parameter in config.yaml on your edge box
# otherwise TLS certificate validation will fail
    config['edgehostname'] = 'your FQDN for your edge box'  # e.g. 'mygateway.contoso.local'
#steve - path to the 'root ca' certificate used for the IoT Edge TLS cert
    config['edgerootcacert'] = 'the path to your root ca cert for edge'  # e.g. '/home/stevebus/edge/certs/azure-iot-test-only.root.ca.cert.pem'

    test_iot_hub_send(config)

The code is a little hard to read in blog format, so feel free to copy/paste into your favorite python editor to view it.

The key changes are to the line that generates the ‘username’ for the connection string, changing it from a ‘hub level’ key to a device-level key


endpoint = "{}@sas.{}".format(target['device'], hub_name)

and the two lines that allow me to customize the SASLPlain authentication information to add in the path to the IoT Edge root CA cert


auth_settings = uamqp.authentication.SASLPlain(live_iothub_config['edgehostname'], auth_username, sas_token, verify=live_iothub_config['edgerootcacert'])

send_client = uamqp.SendClient(target, debug=True, auth=auth_settings)

When you run the sample, you’ll see a ton of debug output. At the top you should see your connection string dumped out, but most importantly, if it works, you should see a line like this somewhere in the middle of the output


2019-03-07 19:00:15,893 uamqp.client DEBUG Message sent: &lt;MessageSendResult.Ok: 0>, []

This indicates a successful sending of a message to IoT Hub/Edge.

Enjoy, and as always, feel free to ping me via my contact page and/or via comments here

Quick update on MQTT and message routing in IoT Hub and IoT Edge

I’ve made an update to my posts on using a standard MQTT client and using Node-Red to connect to IoT Edge via MQTT.

One thing I missed in the original post, that I needed to figure out today for a customer, is that if you want to route messages in IoT Edge based on the message body, you need to use the contentType and contentEncoding fields to tell edgeHub that the content is, in fact, JSON, and also what encoding it is (i.e. utf-8, utf-16, etc). This is not unique to IoT Edge, but a requirement for IoT Hub itself as well.

The way you do that is by appending ‘properties’ to the end of your MQTT topic to indicated the content type and the content encoding. In MQTT, those are the $.ct and $.ce properties, respectively.. So, regardless of your client, you do that by appending the values $.ct=application/json and $.ce=utf-8, after URL encoding them, to your topic, like this:

devices/[device_id]/messages/events/$.ct=application%2Fjson&$.ce=utf-8

where [device_id] is obviously the device id in iot hub of your sending device. This allows you to do things like this in your IoT Edge routing (pretend we are sending a message like {“messageType”:”alert”, ……})

{
"routeToAlertHandler":"FROM /messages/* WHERE $body.messageType='alert' INTO ........
}

Enjoy! and, as always, if you have any questions, hit me up in the comments section or twitter/etc (links in my ‘about me’ page)

Mosquitto MQTT broker to IoT Hub/IoT Edge


EDIT:  edited on 8/30 to change tls version to tls 1.2.  Seems that TLS 1.0 doesn’t work any more.  Thanks to Asish Sinha for the heads up.  Also updated the api-version to the latest


Earlier, I had a post on connecting an MQTT client to IoT Edge.

It seems like lately my team and I have had a lot of customers with brownfield equipment that can speak MQTT, but are either too old or too low powered (the devices, not the customers Smile)  to do MQTT over TLS.  It is also often the case that you have no real control over the MQTT topic(s) that the device sends events/messages over.  Additionally, many devices even imply “intelligence” or “data” into the topic structure, meaning the topic hierarchy itself conveys information vs. only having important information in the message payload.

Both a TLS connection, and sending data on a very specific topic, are current requirements to talk to either IoT Edge or IoT Hub itself over MQTT.   So, how do we overcome this impedance mismatch between what IoT Hub/Edge requires, and the equipment can do?   One way is to use a middle layer to do the translations.  A popular choice is the open source MQTT broker mosquitto from the Eclipse Foundation.   Mosquitto has a built-in option to set up an MQTT “bridge”, in which the broker will accept incoming messages over MQTT and then forward them as an MQTT client to another MQTT server.  The good news is, Mosquitto can listen to the unencrypted MQTT traffic (port 1883 by default), and then forward it along over a TLS-protected MQTTS connection (port 8883) via this bridge. 

That takes care of our MQTT vs. MQTTs issue.  But what about the any topic vs. a specific topic problem.  Unfortunately, IoT Hub and IoT Edge both only accept telemetry/event data on a specific MQTT topic:  devices/[device-id]/messages/events where [device-id] is the ID of the connected device.  That one is a little trickier, and will be addressed later in this post after we cover the basics of setting up the bridge.

A couple of notes/caveats before we get started:

  • I am NOT a mosquitto expert.  I’ve learned just enough to get this working Smile
  • This is certainly not the only way to solve this problem.  But is one way that seems to work pretty well.
Mosquitto Bridge Setup for IoT Hub/Edge

Before we can configure our Mosquitto MQTT bridge, there are a few pre-requisites to take care of 

  • If you don’t already have one, create an IoT Hub and create a device (only follow that one section) that will represent our Mosquitto broker. The messages in IoT Hub/Edge will appear as if they come from the broker as the IoT device.
  • If you are talking directly to IoT Hub, you can skip this step.  If you are wanting to route your messages through IoT Edge, you need to setup an IoT Edge device as a gateway.
  • Gather the TLS server-side root certificate.  In order for mosquitto to establish a TLS connection to either IoT Hub or IoT Edge, it needs to trust the server-side TLS certificate that will be presented to the broker when it tries to open the connection to IoT Hub/Edge.  Gathering the CA cert from which the TLS server-side cert was generated, the process differs slightly based on whether you are connecting to IoT Hub or IoT Edge.  Either way, save the cert to a file on the mosquitto server, we’ll use it later.

For IoT Hub, the TLS certificate chains up to the public DigiCert Baltimore Root certificate. You can create this file by copying the certificate information from certs.c in the Azure IoT SDK for C. Include the lines —–BEGIN CERTIFICATE—– and —–END CERTIFICATE—–, remove the ” marks at the beginning and end of every line, and remove the \r\n characters at the end of every line.  Name the file with a .pem extension.

For IoT Edge, use whatever root certificate you used to create the IoT Edge Device CA Certificate.  If you used our convenience scripts to set up IoT Edge, that will be the azure-iot-test-only.root.ca.cert.pem found in the ‘certs’ folder where you ran the scripts

Now that we have our pre-req’s finished, we can do our Mosquitto  bridge setup.  This is done via the Mosquitto configuration file.   There may be other things in that file, however, below is an example configuration entry.


# Bridge configuration
connection azureiot-bridge
log_type debug
address [edge or hub fqdn]:8883
remote_username [iothub-shortname].azure-devices.net/[device-id]/api-version=2019-03-31
remote_password [sas-token]
remote_clientid [device-id]
bridge_cafile [iot hub or edge root ca cert]
try_private false
cleansession true
start_type automatic
bridge_insecure false
bridge_protocol_version mqttv311
bridge_tls_version tlsv1.2
notifications false
notification_topic events/

topic devices/[device-id]/messages/events/# out 1

The parts in bold need to be replaced with your values, where

  • [iot hub or edge FQDN] is the DNS name of either your IoT Hub (including the .azure-devices.net) or your IoT Edge device  (i.e. whatever name was used as the ‘hostname’ in config.yaml on IoT Edge)
  • [iothub-shortname] is the name of your IoT Hub  (e.g. ‘myiothub’) without the .azure-devices.net
  • [device-id] is the name of the IoT device created in IoT Hub to represent this broker
  • [sas-token] is a SAS token generated for that device-id in that hub
  • [iot hub or edge root ca cert] is the full path to the root certificate file you created earlier
  • All values are case sensitive.

The very last line (that starts with the word ‘topic’) subscribes the bridge to all messages that are sent with the topic structure of ‘devices/[device-id]/messages/events/#’ (the # is a wildcard to include any sub-topics). When a message that fits that topic structure gets published, the bridge will get it and pass it along to the IoT Hub/Edge.

restart your Mosquitto broker using the updated configuration file.  You should see debug output indicating that it has connected the bridge (and if you are using IoT Edge, you should see debug output in the edgeHub logs showing the connection from the broker)

If you want to test the connection, you can send a test message using the mosquitto_pub command, using the following command (replacing [device-id] with your device id you created above):


mosquitto_pub -t devices/[device-id]/messages/events/ -m "hello world!"

The trailing slash is important and required. You should see the message above be forwarded by the MQTT bridge to either IoT Hub or IoT Edge.

If you are fortunate enough to have full control over your MQTT topic structure from your devices, and there is no intelligence in your topic structure, you’re done.  Congrat’s and have fun!  You can just point your MQTT clients at the broker address (making sure you update the MQTT topic to point to devices/[device-id]/messages/events/) and rock and roll.

However, for the use cases where you don’t have MQTT topic control, or there is intelligence in your topic hierarchy, keep reading.

MQTT Topic Translation

Unfortunately, this is where things get a little less “clean”.  The mosquitto MQTT bridge has no ability to “rewrite” or completely change the topic structure of the messages it receives.  One way to do it is to write a simple client that subscribes to all potential topics from which the MQTT devices might send data, and then resend the payload after translating the MQTT topic into the IoT Hub/Edge required topic structure. 

Below is a simple python script that I wrote to do the translation as an example.  This sample subscribes to all topics (#  – the wildcard) and, if the message doesn’t already use the IoT Hub/Edge topic structure, it simply resends the message payload using the hub/edge topic.


import paho.mqtt.client as mqtt
import time

#replace [device-id] with your device you created in IoT Hub.
iothubmqtttopic = "devices/[device-id]/messages/events/"

# this sample just resends the incoming message (on any topic) and just
# resends it on the iothub topic structure.  you could, of course, do any
# kind of sophisticated processing here you wanted...
def on_message(client, userdata, message):
     global iothubmqtttopic
     if(message.topic != iothubmqtttopic):
         messageStr = str(message.payload.decode("utf-8"))
         print("message received " ,messageStr)
         print("message topic=",message.topic)
         client.publish(iothubmqtttopic, messageStr)

# replace &lt;broker address> with the FQDN or IP address of your MQTT broker
broker_address="[broker address]"

print("creating new instance")
client = mqtt.Client("iottopicxlate") #create new instance
client.on_message=on_message #attach function to callback
print("connecting to broker")
client.connect(broker_address) #connect to broker

print("Subscribing to all topics")
client.subscribe("#")

client.loop_forever() #stop the loop

Of course, this is one extremely simple example, that just passes along the same message payload and swaps out the message topic.  You can, of course, add any kind of sophisticated logic you need.  For example, you could parse the topic hierarchy, pull out any ‘intelligence’ in it, and add that to the message payload before sending.

if you want to test this, copy this python script to a file, edit it to add your device id and URI of your mosquitto broker, and run it.  You can then try….


mosquitto_pub –t /any/topic/structure/you/want –m "hello world"

You should see the python script receive the file, do the translation, and republish the message.  Then the mosquitto bridge will forward the new message along to IoT Hub/Edge.

Connect MQTT client to Azure IoT Edge

NOTE:  Edited on 9/13/2018 to fix bugs in code and make it send data in a loop, just to be more realistic test

NOTE:  Edited on 2/14/2019 (Happy Valentine’s Day!) to add the contentType and contentEncoding values to allow you to route on message bodies.

As you may know, MSFT provides some nice SDKs to connect devices to IoT Hub.  Those SDKs abstract away much of the complexity of connecting, protocol abstraction, device twins, direct methods, etc.

However, there are many reasons, in particular “brownfield” devices, where you might prefer to connect via an open source MQTT library, like the nice Paho MQTT library, directly to IoT Hub.  The IoT product group has put together a very good description and sample code for connecting your MQTT device directly to IoT Hub.

With the general availability of Azure IoT Edge, the natural next question is “Can I connect my MQTT devices to IoT Hub *through* IoT Edge?”.  This lets you take advantage of all the nice local processing and cloud services you can pull to the Edge, but make minimal changes to your MQTT-based IoT devices.

The short answer is YES!  For the (only slightly) longer answer, keep reading.

There are only a few steps needed to make this happen.

  • If you haven’t done it yet, you need to set up IoT Edge as a transparent gateway.   The instructions for that are here (linux) and here (windows)….(don’t read too much into the “transparent” part of that, as you can still add other modules such as custom code, Azure ML, Stream Analytics, etc)
  • The MQTT client will establish a TLS connection to the IoT Edge device.  As such, it needs to trust the server certificate that the edgeHub component of IoT Edge presents to it.  For the MQTT/TLS connection to work, depending on the MQTT client (I use the paho-mqtt library below, just like the IoT team did), you’ll likely need the “root ca” certificate that was used to generate the device ca certificate used in IoT Edge.  If you used our test scripts provided at the links in step 1 above, then the certificate you need is at $CERTDIR/azure-iot-test-only.root.ca.cert.pem  (where $CERTDIR is the same one from step 1).  If you used a “real” certificate authority, like Baltimore, DigiCert, etc, they each generally have a method to get their public signing certs.   (we happen to have a couple of them here).   You will need to have them in a file you can reference on the file system of the MQTT box.
  • Your MQTT client needs to be able to resolve the hostname of your IoT Edge box (i.e. you should be able to ping it by name).  If you used a “real” FQDN in DNS for your IoT Edge box, then you are good.  If you didn’t, you may have to add a “hosts” file entry (/etc/hosts on Linux or \windows\system32\drivers\etc\hosts on Windows) to resolve the name.   This name should match the “hostname” parameter from the IoT Edge’s config.yaml file.
  • Finally, we need to make a few minor modifications to the sample code provided by the IoT product group, as seen below…   The biggest change is that, while we still need to authenticate the device to IoT Hub with a valid SAS token for the IoT Hub (and thus the credentials stay the same as the direct case), the actual connection point will be edgeHub.

The code changes to the python script are shown below.  I’ve commented each change with a comment starting with #EDGE. Also, if you copy and paste the code, my blog editor doesn’t respect spaces, so you need to indent the lines under the on_xxxx function definitions, and the code under the while(True) statement

from paho.mqtt import client as mqtt
import ssl

import time

path_to_root_cert = '[path to root CA cert]' # e.g. './azure-iot-test-only.root.ca.cert.pem'
device_id = "[iot device id]" # e.g. "myIoTDevice"
sas_token = "[generated SAS token]" # e.g. SharedAccessSignature sr=exampleIotHub.azure-devices.net%2Fdevices%2FmyIoTDevice&amp;sig=8%2Fo6sdsFE%2BplYLQJrxIo5Usx1iVV0gnySaVhkh7aNOk%3D&amp;se=1563635795"
iot_hub_name = "[iothub short name]" #e.g. exampleIoTHub

#EDGE - the FQDN of the device.. for example: myedgedevice.local
edge_device_name = "[edge device name]"

def on_connect(client, userdata, flags, rc):
print ("Device connected with result code: " + str(rc))
def on_disconnect(client, userdata, rc):
print ("Device disconnected with result code: " + str(rc))
def on_publish(client, userdata, mid):
print ("Device sent message")

client = mqtt.Client(client_id=device_id, protocol=mqtt.MQTTv311)

client.on_connect = on_connect
client.on_disconnect = on_disconnect
client.on_publish = on_publish

#EDGE - we need to add the + "/api-version=2016-11-14" (api version) to the end of the username. Technically, you can do this if you are
# talking directly to IoTHub as well, but it's optional. Edge seems to require it.
client.username_pw_set(username=iot_hub_name+".azure-devices.net/" + device_id + "/api-version=2016-11-14", password=sas_token)

client.tls_set(ca_certs=path_to_root_cert, certfile=None, keyfile=None, cert_reqs=ssl.CERT_REQUIRED, tls_version=ssl.PROTOCOL_TLSv1, ciphers=None)
client.tls_insecure_set(False)

# start paho's background processing

client.loop_start()

#EDGE - although we are still authenticating to IoTHub with the IoTHub based SAS token, we are actually connecting
# to IoT Edge device's MQTT endpoint

client.connect(edge_device_name, port=8883)

i=0

while(True):

payload = "{"message_id": %d}" % (i)

client.publish("devices/" + device_id + "/messages/events/", payload, qos=1)

time.sleep(5)

i=i+1

NOTE:  *if* your payload is JSON, and *if* you think you might want to do routing of the messages based on the *body* of the message, you need to send a content type of ‘application/json’ and a content encoding of ‘utf-8’  (or 16, etc).  to do that, we need to append that information (url-encoded) to the MQTT topic, which gets passed in as a system property.  So, in that case, the ‘publish’ call would look like this (note the ‘/$.ct=application%2Fjson&$.ce=utf-8’ appended to the MQTT topic)

client.publish(“devices/” + device_id + “/messages/events/$.ct=application%2Fjson&$.ce=utf-8”, payload, qos=1)

That’s it. At this point you should be able to run your script and see the successful connection reflected in your edgeHub logs (docker logs -f edgeHub) and, assuming you have the default route set (“FROM /* INTO $upstream”), see the data flowing into IoTHub. (note that the sample app only sends one message and then stops… CTRL-C to exit and run again).

Enjoy!

PIP install for Python SDK now works on Raspberry Pi!

The Azure IoT product group has been busy making improvements to our Python SDK for Azure IoTHub.  The biggest improvement is that they’ve put a fix in for the infamous “libboost” issue that prevented the PIP package from working on the Raspberry Pi.   Previously, if you wanted to use the Python SDK on a Raspberry Pi, you had to manually build from the source, a time and resource intensive process.

If you aren’t familiar with it, Boost allows you to invoke C code from Python (the Python SDK is built on the C SDK).

Base SDK install/usage

For now, they’ve updated the SDK to link against the current version of libboost that works on the latest version or Raspbian stretch (1.62.0).  Future improvements may remove this requirement, but for now, you need to make sure that libboost is installed on the Pi (it’s not, by default).  So use the following two statements to get the SDK installed and setup:

sudo apt-get install libboost-python1.62.0

pip install azure-iothub-device-client
After that, in your code, you can ‘import iothub_client’ and go to town!

IoT Edge/Docker

As a bonus (for writing IoT Edge modules for the RPI), i did a quick test to confirm that all of this works in a docker container too.  There will be official guidance and tooling from the IoT product group in the future, but for now, a simple Dockerfile like this works for creating a docker image that contains a Python app that uses our Python SDK…

FROM python:2.7.15-stretch

WORKDIR /usr/src/app

RUN apt-get update && apt-get install libboost-python1.62.0

COPY requirements.txt ./

RUN pip install --no-cache-dir -r requirements.txt

COPY . .

CMD [ "python", "-u", "./app.py" ]

the requirements.txt file, just contains one line:   “azure-iothub-device-client”

next up, I’ll be testing with a full blown IoT Edge module on the raspberry pi, and I’ll post the results soon